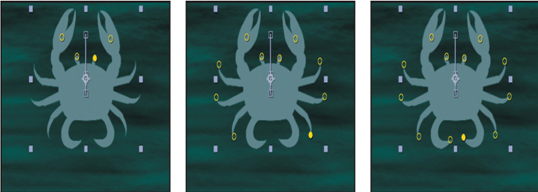
Position pins are the basic component of the Puppet effect. Where you place these pins and how you position them determine how the objects move on the screen. You’ll place Position pins and display the mesh that After Effects creates to determine the area of influence for each pin.
When you select the Puppet Position Pin tool, the Tools panel displays the Puppet tool options. Each pin has its own properties in the Timeline panel, and After Effects automatically creates an initial keyframe for each pin.
- Select the Puppet Position Pin tool (
) in the Tools panel.

- Go to 1:27, just before the crab scales down to its final size.
- In the Composition panel, place a Position pin in the middle of the crab’s left pincer.
A yellow dot representing the Position pin appears in the Composition panel. If at this point you were to use the Selection tool ( ) to move the Position pin, the entire crab would move with it. You need more pins to keep the other parts of the mesh in place. - Using the Puppet Position Pin tool, place another Position pin in the middle of the right pincer.
Now you can move a pincer with the Selection tool. The more pins you place, the smaller the area of influence for each pin, and the less each area will stretch.
- Select the Selection tool ( ), and drag one of the Position pins to see its effect. Then return it to its original position by pressing Ctrl+Z (Windows) or Command+Z (macOS).
6. Select the Puppet Position Pin tool again, and then place additional Position pins at the top of each antenna, at the end of each side leg, and at the tip of each of the crab’s swimming legs.

7. In the Timeline panel, expand the Mesh 1 > Deform properties. Each Position pin is listed.
