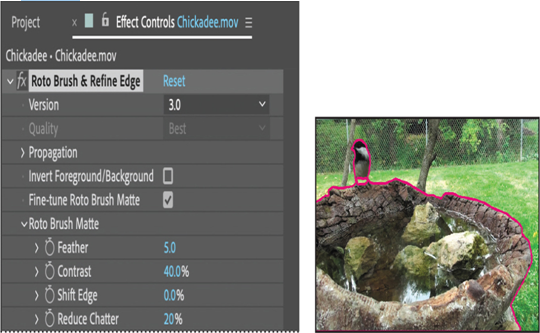
When you use the Roto Brush tool, After Effects applies the Roto Brush & Refine Edge effect to the layer. You can modify the effect using settings in the Effect Controls panel. You’ll use those settings to further refine the edge of the matte.
- Press the spacebar to play the clip in the Layer panel. Press the spacebar again to end the preview when you’ve seen the whole clip.
As you preview the clip, you may notice that the segmentation boundary jumps around a bit. You’ll adjust the Reduce Chatter and Contrast settings to make it smoother.
- In the Effect Controls panel, decrease the Contrast to 40% and increase Reduce Chatter to 20%.

The Reduce Chatter value determines how much influence the current frame has when performing a weighted average across adjacent frames. Contrast affects how tight the boundary is.
- Preview the clip again.
Refine Soft Matte and Refine Hard Matte effects
After Effects includes two related effects for refining mattes: Refine Soft Matte and Refine Hard Matte. The Refine Soft Matte effect does the same thing as Refine Edge Matte, except it applies the effect to the entire matte at a constant width. If you need to capture subtle variations across an entire matte, use this effect.
The Refine Hard Matte effect performs the same edge refinements as the Roto Brush when Fine-Tune Roto Brush Matte is turned on in the Roto Brush & Refine Edge effect in the Effect Controls panel.
Using the Refine Edge tool
When an object isn’t smooth, the Roto Brush may not pick up the nuanced edge. The Refine Edge tool lets you include fine details such as wisps of hair in designated areas of the segmentation boundary.
Though it might be tempting to use the Refine Edge tool immediately after creating the base frame, it’s best to wait until you’ve refined the segmentation boundary across the entire clip. Because of the way After Effects propagates the segmentation boundary, using the Refine Edge tool too early results in a matte that is difficult to use.
- Go to the base frame, which is the first frame of the clip, and then zoom in so that you can see the edges of the bird’s tail clearly. Use the Hand tool if necessary to move the layer so you can see the entire bird.
- Select the Refine Edge tool ( ), hidden beneath the Roto Brush tool in the Tools panel.
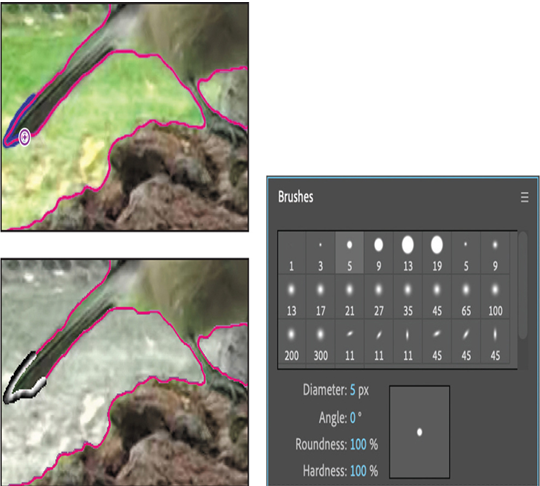
The tail is relatively soft, so a small brush size will work well. For a fuzzier object, you might have better results with a much larger brush. The brush needs to overlap the stray edges that emerge from the object. - Change the brush size to 5 pixels.
When you use the Refine Edge tool, draw strokes along the edges of the matte. - In the Layer panel, move the Refine Edge tool over the edge of the tail straddling the segmentation boundary and including the variations in the feathers. You can use multiple strokes if needed.

When you release the mouse, After Effects switches to the Refine Edge X-ray view so that you can see how the Refine Edge tool changes the matte, capturing the detail in the edges.
- Move the current-time indicator across the time ruler to view the edge. At 0:15, Refine Edge breaks away from the tail as the bird moves away rapidly.
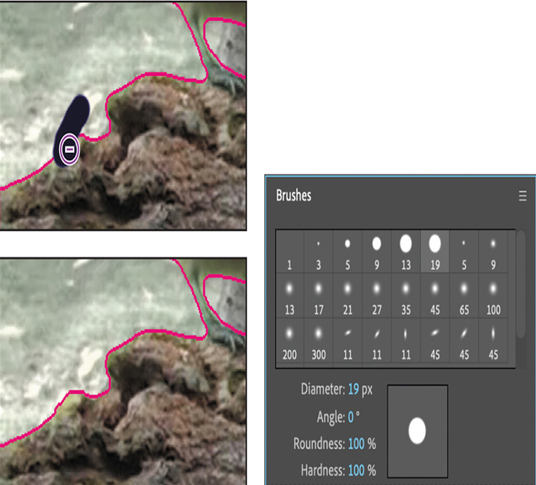
- Change the brush size to 19 pixels.
- At 0:15, press Alt (Windows) or Option (macOS) and erase the artifact from the Refine Edge tool, as it’s no longer useful going forward.
- Continue to move forward and backward through the scene, applying the Refine Edge tool wherever the matte’s edge doesn’t capture the fuzziness of the bird’s feathers, and removing it wherever it strays from the tail.

- Zoom out to see the entire scene, resize the Layer panel if you enlarged it, and then choose File > Save to save your work.
Note
Use the Refine Edge tool only after you have cleaned up the matte across the entire clip.
